4. The code editor panel#
The code editor is used mainly for writing, saving and executing programs on the robot.
testing. These programs are sequences of the proprietary commands described in the
Programming Manual. The robot’s command interface does not support conditionals, loops,
or other flow control statements, nor variables. Comments are entered in C/C++ style
(e.g., // and /* */).
Note that you can also write a program outside the web interface (e.g., in your preferred integrated development environment) that uses the robot’s TCP API to parse the robot’s feedback, control the robot, and handle all flow control logic. You can use any language that supports communication over TCP/IP (e.g., C/C++, C#, Python, Java or even Structured Text).
We offer a Python API on our GitHub account.
4.1. Creating programs#
You can create a new program using the  button in the upper-right corner of
the panel.
button in the upper-right corner of
the panel.
The program name can be changed and the program saved to the robot’s
non-volatile memory by either double-clicking on the program tab or by clicking the icon
 at the bottom of the code editor panel, which is equivalent to pressing the
shortcut Ctrl+Shift+s. You can also save the program directly using the shortcut
Ctrl+s.
at the bottom of the code editor panel, which is equivalent to pressing the
shortcut Ctrl+Shift+s. You can also save the program directly using the shortcut
Ctrl+s.
To save and load programs from the robot, you must be connected to it in control mode,
i.e., the connection state icon displayed in the menu bar must be  .
.
4.2. Program manager#
You can view the list of programs saved on the robot by clicking the  button to
open (or hide) the program manager.
The program manager shows icons to edit, delete, or load/unload programs.
button to
open (or hide) the program manager.
The program manager shows icons to edit, delete, or load/unload programs.
4.3. Downloading programs on your PC#
You can also save the contents of the active code editor tab to your computer’s
Downloads folder by clicking the  icon.
In addition, you can load a program from your computer, by clicking
the
icon.
In addition, you can load a program from your computer, by clicking
the  icon.
icon.
4.4. Programs names#
Programs can be saved in different folders. To specify a folder, and simultaneously create it if it does not exist, simply type the name of the folder followed by a slash, immediately before the name of the program. You can specify multiple layers of folders. Naturally, the program names in a given folder must be unique, as well as the sub-folder names in a given folder.
Program and folder names are case sensitive and must contain a maximum of 63 characters among the 62 alphanumerical (A..Z, a..z, 0..9), the underscore and the period.
4.5. Programs status#
A yellow dot to the right of the program’s name indicates that the program has been
changed and needs to be saved. If a syntax error is found in the code, during the
saving, the yellow dot will turn red, and a red  will appear in front of
each line of code containing a syntax error. Note that the syntax validation is
performed by the robot (and not by the MecaPortal) when the program is saved. Local
changes won’t be validated until the program is saved again.
will appear in front of
each line of code containing a syntax error. Note that the syntax validation is
performed by the robot (and not by the MecaPortal) when the program is saved. Local
changes won’t be validated until the program is saved again.
The programs that appear in the code editor panel are simply those opened in the
MecaPortal and not necessarily in the robot’s memory. The MecaPortal will locally save
(in the browser’s local storage) the opened programs, whether or not they are saved on
the robot. To open a program that is already in the robot’s memory, click on the
icon. You can also delete programs from the same menu. Alternatively, you
can delete a program that is opened and in focus, by clicking the  icon. To
simply close an open program, click the × on the tab with the program name.
icon. To
simply close an open program, click the × on the tab with the program name.
4.6. Editing programs#
The code editor provides syntax highlighting. In addition, once you start typing a command, a list of suggestions appears, allowing auto-completion. Furthermore, a brief description of the command appears, as shown in Figure 1. Additionally, pressing the secondary mouse button when your mouse cursor is over the code editor text field brings a context menu with all available commands (Figure 2). The most important group is in “TO CURRENT POSITION” which inserts the selected command at the text cursor with the arguments corresponding to the current robot position, the current Tool Reference Frame (TRF), and the current World Reference Frame (WRF). To cancel the context menu without inserting a command, press Esc or click away.
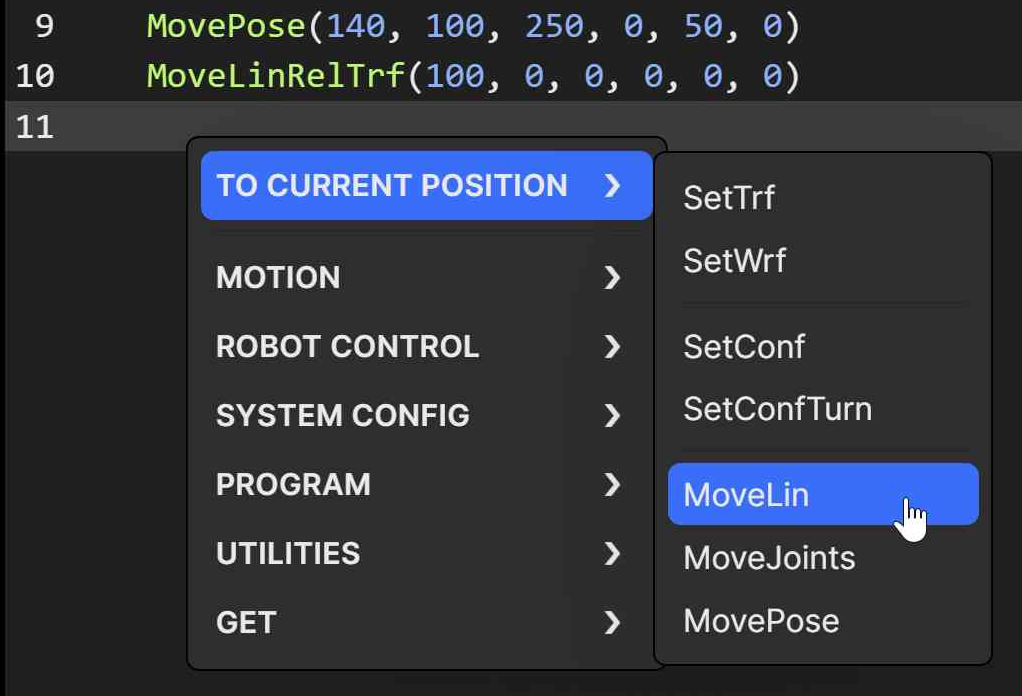
Figure 2 Context menu in the code editor#
The code editor includes various editing features for productive source code editing. The shortcuts for accessing these features are presented in Table 2. Note that you can select a block of text, a box of text (column select), or even have multiple cursors. Each line that has a text cursor or a selection of text becomes highlighted in gray and is called an active line. For example, in Figure 2, line 11 is an active line.
Shortcut |
Action |
|---|---|
Ctrl+Space |
Open the auto-complete popup menu |
Ctrl+Shift+Space |
Open the command help popup |
Ctrl+a |
Select all |
Ctrl+d |
Add selection to next find match |
Ctrl+f |
Open the find and replace dialog |
Ctrl+g |
Open the “go to line” dialog |
Ctrl+/ |
Comment/uncomment active line(s) |
Ctrl+Home |
Move cursor to the beginning of the first line |
Ctrl+End |
Move cursor to the end of the last line |
Ctrl+→ |
Move cursor to next group |
Ctrl+← |
Move cursor to previous group |
Double click |
Select group |
Triple click |
Select line |
Alt+↑ |
Move active line(s) up |
Alt+↓ |
Move active line(s) down |
Shift+Alt+↑ |
Duplicate active line(s) and insert result above |
Shift+Alt+↓ |
Duplicate active line(s) and insert result below |
Alt + click & drag |
Select a box of text (column select) |
Ctrl + click |
Place multiple cursors for simultaneous editing |
4.7. Calling programs#
Programs can be started after they have been saved on the robot using:
StartProgram("my_folder/my_subfolder/program123")
4.8. Executing code from the code editor#
You can execute code directly from your code editor (whether or not it is saved on the robot) by pressing
the  button at the bottom of the code editor panel. Alternatively, you can
execute only the active line(s), by pressing the
button at the bottom of the code editor panel. Alternatively, you can
execute only the active line(s), by pressing the  button, or by pressing
Ctrl+Enter.
button, or by pressing
Ctrl+Enter.
Once the robot starts executing motion commands, the  button will become
highlighted in yellow, and the green status bars in the menu panel will start blinking.
You can press that button (or Alt+;) at any time to stop the robot and
clear its motion queue (i.e., to send the
button will become
highlighted in yellow, and the green status bars in the menu panel will start blinking.
You can press that button (or Alt+;) at any time to stop the robot and
clear its motion queue (i.e., to send the ClearMotion command to the robot).
Alternatively, you can press the  button (or Alt+.) to pause the
execution of motion commands (i.e., to send the
button (or Alt+.) to pause the
execution of motion commands (i.e., to send the PauseMotion command to the robot).
To resume the execution of motion commands, press the button again (which
sends the ResumeMotion command).
At any time, if a motion error occurs (either while the robot is executing a command or
is idle), the button will become red. Pressing that button, or clicking the “Reset
error” link in the red popup that will appear, acknowledges and resets the error (i.e.,
the MecaPortal sends the ResetError command to the robot). Once the error was reset, you
need to ResumeMotion, by clicking the  button (now blue).